How it works
Damage Control is an easy-to-use app and dashboard to manage your fleet and perform your compliance checks. Our quick guide below will help to get you started.
Jump to:


Step 3: Creating and viewing reports
All reports are stored on Damage Control so you can view them any time.
Condition reports include:
-
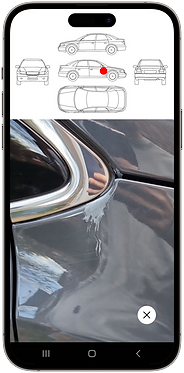
Adding photos
-
Marking damage
-
Making notes
-
Signing and sharing
Further capabilities from your dashboard allow you to:
-
Create checklists
-
Add documents
-
Add members to your organisation (if you have employees)


How to use Damage Control
Our app has been designed with simplicity in mind. This short video shows you how quick it is to:
-
Add vehicles
-
Create condition reports
-
Mark damage
-
Sign
-
Share
Learn more about the app and your dashboard below
Your dashboard
Jump to:
Step 4: Creating checklists

Forms and checklists are very useful and often required by law. They're customisable so that you can create the forms you need and for each vehicle. To create forms:
-
Select "Forms" from the tab on the left (or bottom of the screen on mobile / tablet)
-
Select "Add new form" or an existing form to edit
-
A preview phone will show up to demonstrate how the form will look on your app
-
Edit the form on the right hand side
-
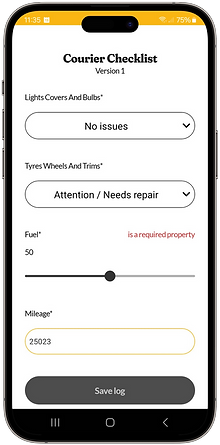
When editing forms you can select the input method to be used on the app (text box, number, checkbox, dropdown, date and slider). For each input method you can select "Advanced options" for further customisation.
-
You can also select if you want the question to be "Required" - this means you will need to complete this question to finish and save the log.
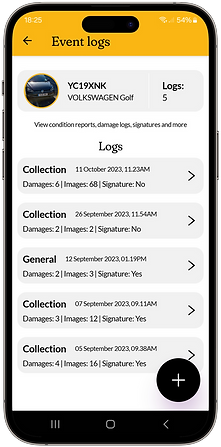
Step 3: Logs - viewing, sharing and more

You have lots of options once you've selected a log:
-
View all photos:
-
View all damages
-
View or request a signature
-
View the completed form / checklist for this log (if applicable)
-
View or add documents to this log
-
View notes for this log (
if applicable) - Share this log and view who it has previously been shared with
- Download this entire log
- Delete this log
Step 1: Using the dashboard

Your dashboard is laid out in columns from left to right. When you first arrive at your dashboard you will automatically have the "Vehicles" tab selected. From here you can:
-
Add a new vehicle;
-
Search for any vehicles in your list or entire organisation (even if a different team member added the vehicles);
-
Select a vehicle to do more (see Steps 2 - 4 below).
Access your dashboard
Accessing the dashboard is simple and can be done in any of the following ways:
-
Click "Login" in the top right of our website (mydamagecontrol.com) from your desktop or from the menu of your tablet or mobile phone.
-
Click the link in your welcome email.
-
Go straight to this link: https://admin.mydamagecontrol.com/auth/login
Checklists in the app
Jump to:

Step 2: View checklists
After you have completed the log and your checklist, you can view them in two places:
-
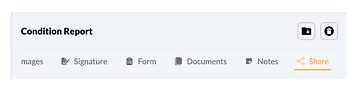
In the app: view the log and press "Form" at the bottom of a log to see the completed checklist
-
On the dashboard: find and select the relevant vehicle. Then find the relevant log. Then select the "Form" button from the tab at the top on the right hand side.
Step 1: Checklists in the app
Once the checklist is on the vehicle, to access it on the app you need to:
-
Select a vehicle
-
Create a new log (press the + button)
-
Complete a log
-
Press "Finish" in the bottom right of the log
-
If you haven't obtained a signature and you see a popup either request a signature or continue without a signature.
-
You will now be shown the form to complete
Checklists: Before you start


Before using the checklists in the app, make sure that you have created a checklist on the dashboard and added it to this vehicle. If you haven't added it to your vehicle, on your dashboard, search for and select the vehicle, then select the edit icon (see above) in the middle column and add the form to your vehicle.

